
Implementation Security & Firewall for IoT Systems
EGAR FIRMANSYAH
Summary
Backend and Frontend IoT Project with Integrated Security: VPN Server, Firewall, IoT Systems, and SSL
This project involves securing the backend server using SoftEther VPN and iptables firewall, as well as developing an IoT system based on the Wokwi simulator. The backend integrates secure connections via a VPN server and network traffic protection using a firewall. Meanwhile, the frontend employs SSL certificates managed through Nginx Proxy Manager to ensure a secure web connection with HTTPS. This system supports IoT device control using the MQTT protocol and Flask as the backend framework.
Project Structure
Backend (Server VM):
- SoftEther VPN Server
- Configured to secure traffic between users and the backend server through encrypted connections.
- Configuration includes creating a virtual hub, managing users, and enabling SecureNAT to ensure stable connectivity.
- Firewall with iptables
- The iptables firewall is implemented to filter connections on specific ports, e.g., only allowing SSH connections from certain IP addresses (VPN Server 1).
- Rules are applied to protect the server from unauthorized access.
- IoT Backend System
- Using Flask to provide a backend interface connected with an MQTT-based IoT simulator on Wokwi.
- The backend acts as a publisher to control IoT devices like lights through the MQTT protocol.
Frontend (IoT System):
- IoT Dashboard
- A web-based interface created using HTML and CSS to visualize IoT device statuses.
- The dashboard supports device control, such as turning lights on and off.
- SSL Security
- The IoT website is secured with SSL certificates using Let's Encrypt to ensure HTTPS connections.
Key Features:
- Secure Access via VPN
- All connections to the backend server are made through a VPN configured using SoftEther VPN.
- Firewall Configuration
- Only IPs from VPN Server 1 can access the SSH port on Server VM 2. Other ports remain closed, except those required for web services.
- IoT System with MQTT
- The Wokwi IoT Simulator connects via the MQTT protocol using the broker test.mosquitto.org.
- The backend can control devices like lights via MQTT messages with statuses "1" (on) or "0" (off).
- SSL Integration for IoT Website
- The IoT website hosted on the VM Server is secured with HTTPS using Nginx Proxy Manager.
Technologies Used:
- SoftEther VPN: For encrypted VPN connections.
- iptables: For firewall configuration.
- Flask: Backend framework for APIs and IoT system logic.
- Docker & Docker Compose: For server environment management.
- Nginx Proxy Manager: For proxy and SSL settings.
- MQTT: IoT device communication protocol.
- Let's Encrypt: For SSL implementation.
- Wokwi Simulator: ESP32-based IoT simulator.
- Cloudflare: For wildcard domain configuration.
- Introduction
- Title: Implementation Security and Firewall for IoT Systems
- Tagline: End-to-End Security Solution for Safe and Efficient IoT Systems
- The project aims to provide a high-security IoT system through the integration of VPN, firewall, and SSL, creating a scalable and reliable solution.
- Challenges
- Faced Issues:
- IoT systems are vulnerable to cyberattacks, such as data theft and unauthorized access.
- IoT backend and frontend connections often lack advanced security.
- Lack of tools that easily integrate security protocols for developers.
- Impacts:
- Loss of user trust.
- Operational disruptions due to cyberattacks.
- High costs for data recovery and infrastructure.
- Faced Issues:
- Solutions
- Security Approaches:
- SoftEther VPN: Secures user connections to the backend server via VPN.
- iptables Firewall: Protects the server from unauthorized access.
- SSL/TLS: Ensures secure web connections with HTTPS through Nginx Proxy Manager.
- Outcome: A secure IoT system that enables encrypted communication between devices and servers while mitigating cyberattack risks.
- Security Approaches:
Conclusion: “Security is a top priority in the rapidly evolving world of IoT. I bring you innovative solutions to protect your IoT systems using VPN, firewall and SSL. With these technologies, your connection is secure, devices are controlled, and data is protected from cyber threats.”
Description
Detailed Implementation Steps
- Adding VPN Server/Firewall on VM Server 1 (IP Address: 110.239.93.223) The SoftEther VPN Server Manager software was used for setup.
- Steps:
- Log in to VM Server 1 with valid credentials.

- Next, I created a folder with the name vpnegar_rill then I cd to the folder, then I did a git clone to https://github.com/SoftEtherVPN/SoftEtherVPN_Stable. If you have successfully cloned to the github address, just cd to the SoftEtherVPN_Stable folder and do the ls command to check what files are in that directory as shown below.

- Then here I install, set up and also configure the VPN server using SoftEther on vm server 1. The command steps are as follows;
- apt install libreadline-dev libssl-dev build-essential libssl-dev zlib1g-dev libncurses5-dev
- ./configure
- make
- make install
- vpnserver start
- VPN Server Successfully started.

- Configure SoftEther VPN Server Software, previously I had downloaded the Client and Server Manager from https://www.softether download.com/en.aspx?product=softether.
- First here I set the Server Manager first, just click New setting in the picture below.

- Next, I gave the name VPN SERVER 1 to the server manager, then for the Hostname Server IP Address 1 (110.239.93.223) which was successfully run by the VPN Server. For the default port, then for the password (B154411d) must be filled in to connect to admin mode, regarding the password I will explain the set up on the next page.

- Type the vpncmd command on the vm server 1 terminal, select number 1 to manage the VPN Server or VPN Bridge, which includes the main vpnserver configuration and settings. I make the hostname ip address localhost, virtual hub name blank or just enter it directly if it is the first time accessing the vpncmd, because I have set it up before so there is already a virtual hub name password, then just enter serverpasswordset (B154411d) if so, this password will be used for the server manager to connect to admin mode.

- If the Virtual hub has been created, then the next step is to add manage users by filling in the data “here I made for the user's full name (egarkiw) and password (success05) I made it like that if you have successfully added manage users, it will appear as in the image below.

- The last step to set up Server Manager on SoftEher is to enter the Virtual NAT and Virtual DHCP Function (SecureNAT) settings then click Enable SecureNAT which is the goal so that when the VPN Server is connected there are no errors, Softether Server Manager has been successfully configured.

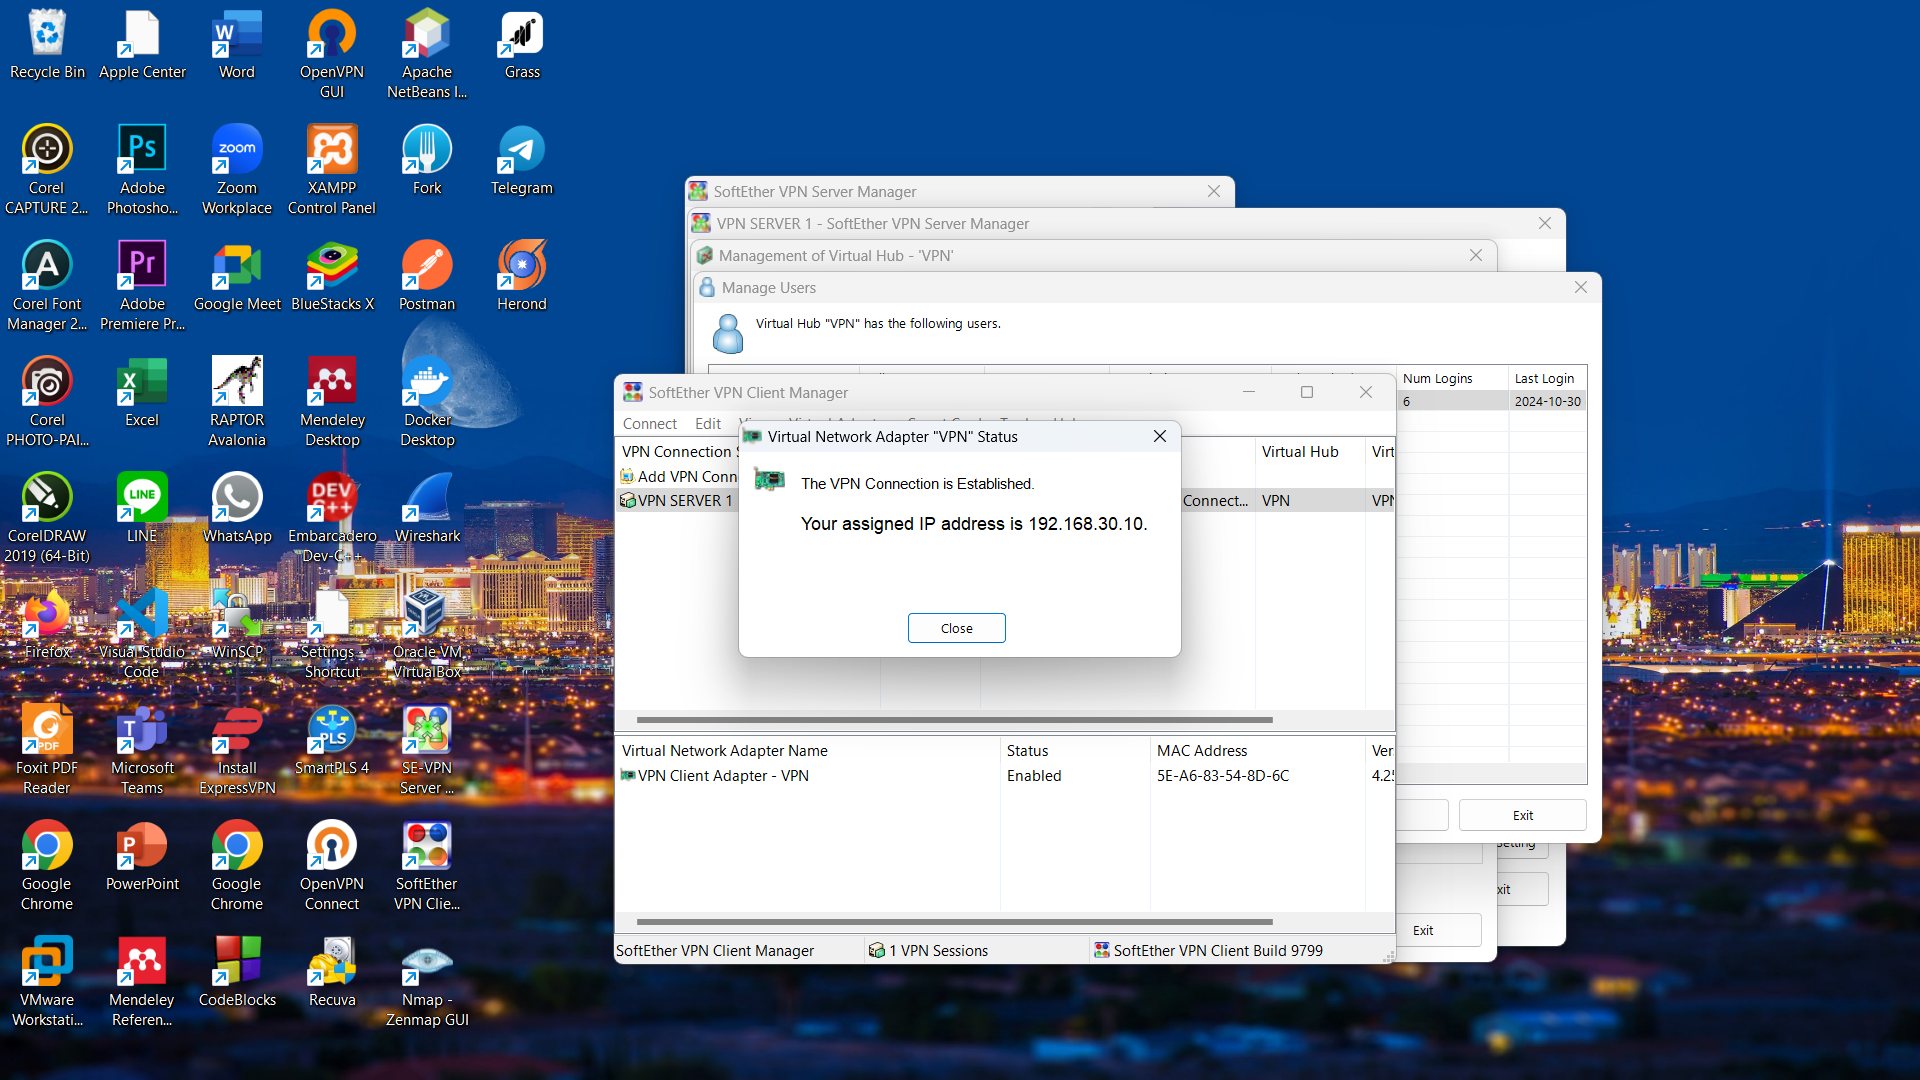
- Configure and Set Up SoftEther VPN Client Manager.
- First click Add VPN Connection, then set the name of the VPN client here I give the name VPN SERVER 1, the port is default / 443 and for the Virtual Hub Name automatically to fill in later. Next, just input the user manager into the Client manager with the User name (egarkiw) and password (success05) as shown below.
- Setting and configuring Client Manage done :).

- Testing the IP before connecting to the VPN Server using the website from https://ipinfo.io/ here shows that I am in Surabaya, East Java by utilizing the internet from the PT Telekomunikasi Indonesia / Indihome Provider.

- Connecting VPN Server using SoftEther VPN Server software if successfully connected will get a pop up as shown below.

- Retesting the IP after successfully connecting to VPN Server 1 which shows that I am in Jakarta using the ip of vm server 1 (110.239.93.223), the ip belongs to Provider Huawei Clouds.

- VM Server 2 with IP address (110.239.71.252), iptables is already installed, which is confirmed through the iptables --version command. This iptables will be used to filter SSH connections on port 22.

- On VM Server 2, an iptables rule is applied to secure the firewall/traffic by filtering SSH connections (port 22). Only IP 110.239.93.223 is allowed to access SSH, while all SSH connections from other IPs will be denied. This is done to protect the backend server especially and the frontend from unauthorized access.

- When iptables on VM Server 2 is enabled, all users who are accessing that server will automatically be logged out. If users try to log back into VM Server 2 without using VPN Server 1 via SSH connection from VM Server 1 IP, then they will not get a response from VM Server 2. To check the open ports on VM Server 2 without using VPN Server 1, I can use the following command with the nmap tool (nmap -Pn 110.239.71.252 -unprivileged), The results show that only port 80 is open, as shown in the image below.

- After connecting to VPN Server 1, the first step is to perform an IP test to ensure that the connection has switched to the IP belonging to VM Server 1, which is part of the Huawei Cloud network. To check the open ports, use the same nmap command as before (nmap -Pn 110.239.71.252 -unprivileged), The result will show that port 22 (SSH) is already open, because VPN Server 1 is active. After ensuring the port is open, I can log in to VM Server 2 as usual using a valid password.

- After successfully logging into VM Server 2, I checked the iptables list with the iptables -L command, it can be seen that the top ACCEPT target belongs to VPN Server 1, which is the provider of Huawei clouds, the addition of Firewall (traffic) VPN Server 1 using SoftEther VPN Server and the application of iptables on VM Server 2 is all successful without any errors :).

- Adding SSL on the website using let'sEncrypt, here I utilize the HTTP 01 challenge because my domain comes from a Public web server using VM Server 1. If you utilize the DNS 01 challenge, it is run if the domain comes from a local server.

- Opening my directory then I type the ls command to see what files are in the directory.
- First I created a configuration file using the nginx-proxy-manager.yml tool by adding nano in front of it, this tool makes it easier to create certificates and is also a little powerful because it already has its own dashboard.

- This is the program code of the nginx proxy manager where the http public port is 80, the https public port is 443 and also the web admin port is 81.

- After completing the setup, the next step is to run Docker Compose with the following command (docker-compose -f nginx-proxy-manager.yml up -d) If successful, you will see the container status running. To verify, use the following command (docker ps) Make sure that the Nginx Proxy Manager image appears in the list of running containers. If the image has appeared, it means that the Nginx Proxy Manager tool has been successfully run. you can see the results as in the image below.

- Creating an IoT system on VM Server 2 which contains the backend program code and also the frontend. for IoT here I use a simulator from the wokwi website, My first step is to enter the directory where I created the IoT system I named SmartHome ESP32 if I have entered next I type the ls command.
- First I created a docker compose file which aims to display the IoT system website that I created.

- This is the program code for docker compose that I will run where the web admin port is 5880.

- Then I also created a Dockerfile which contains commands that will help docker-compose.

- This is the wokwi simulator link which I have created for the iot system and also the program code in the website link.

- Then I created a file with the name publisher-web.py this is the backend program code that must be highly secured because the way it works later it is connected to the wokwi simulator and also runs the system on the frontend later.

- This is the program code for the frontend using html and css of the iot system that I created.


- If everything has been set up, just run the program code using docker compose for the running command itself as follows (docker-compose up -build --force-recreate). If there is already a container running writing means it has been successful to run the program code as shown below.

- Opening the frontend website of VM Server 2 earlier by writing the link (ip server 1: port), it can be seen that the website is still using HTTP requests, which indicates that the website is not yet secure and ranges to be hacked / attacked from outside, indicated by the writing Not Secure and still http on the website.

- Secure the website by adding SSL or the request changes to HTTPS later.
- The first step is to create a domain. In this project, the domain is created through the Cloudflare vendor. Next, the domain is added with the format (*.learn). Domains with this format are called wildcard domains, which are marked with a star symbol (*) in front of them. Wildcard domains allow the domain name to be used for various subdomains, making it suitable for multiple users simultaneously.

- Login to the nginx proxy manager dashboard using the website link, namely (ip server 1: port) the dashboard display is as shown below.
- The way to create SSL for a website domain is to first click Add Proxy host.

- I created a domain called egar.belajar.bisa.ai, which worked because I used a domain (.belajar) that had previously been added through the Cloudflare vendor as a wildcard domain. With this wildcard domain, subdomains like egar.belajar.bisa.ai can be created and managed with flexibility.
Next:
- Forward Hostname/IP: I input the IP of VM Server 2, because the program code is run through that server.
- Forward Port: I set it to 5880, according to the port used in the program code.
This setting allows the egar.belajar.bisa.ai domain to be directed to VM Server 2 on port 5880, as shown in the following illustration.

- Then for SSL here I use the http challenge which later the let's Encrypt will hit / access the domain (egar.belajar.bisa.ai) if you just click the save button.

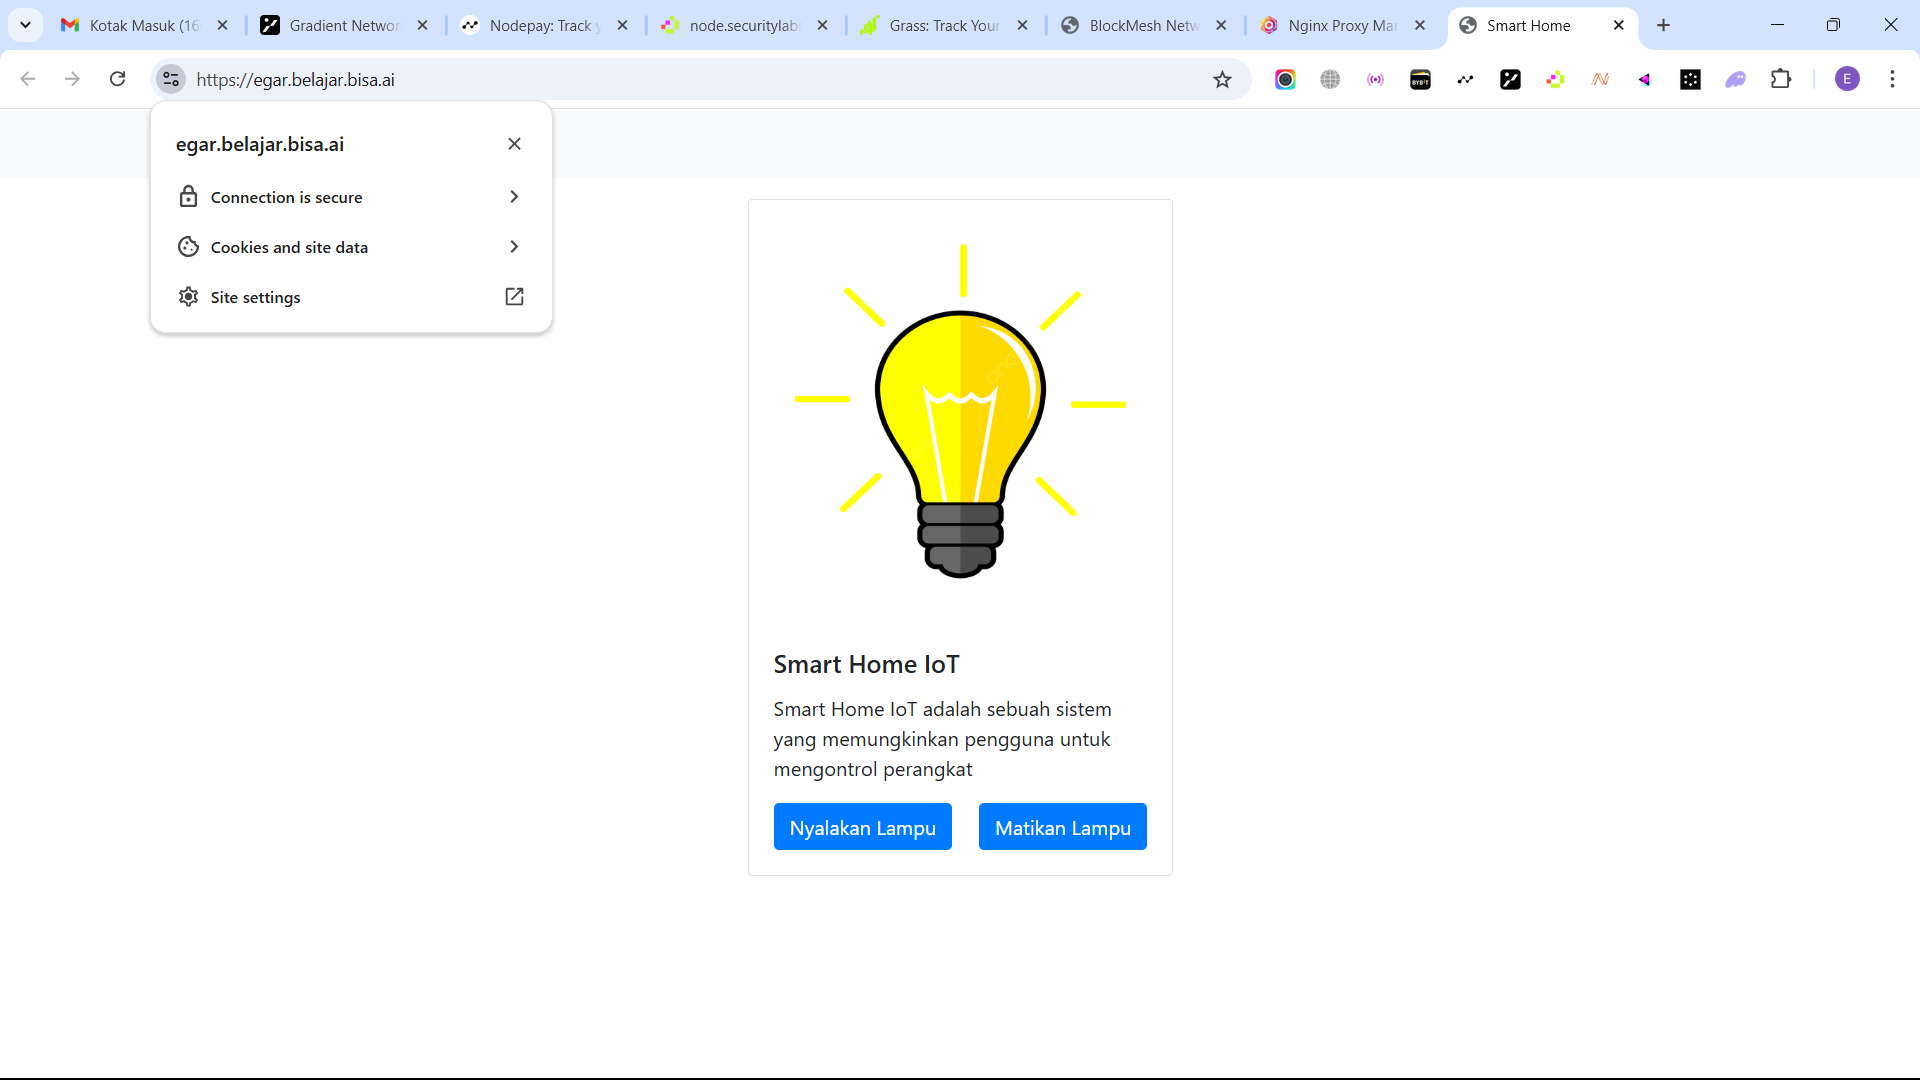
- This is the display if it has been successful to add SSL to the IoT system website that I made earlier with the domain name now changing to egar.belajar.bisa.ai. with SSL status already getting validation from Let's Encrypt and its status is now online / running.

- If I click on the domain (egar.belajar.bisa.ai) it will be directed to a website that has added SSL and the domain name has changed to (https://egar.belajar.bisa.ai/) here my website for running the IoT system can be said to be safe because it has become a web with a request (https).

- Next, I checked for the SSL certificate through Terminal Server 1 which I had run through the server for the command as shown below.
- SSL addition to the Website for implementing the IoT system Done :).

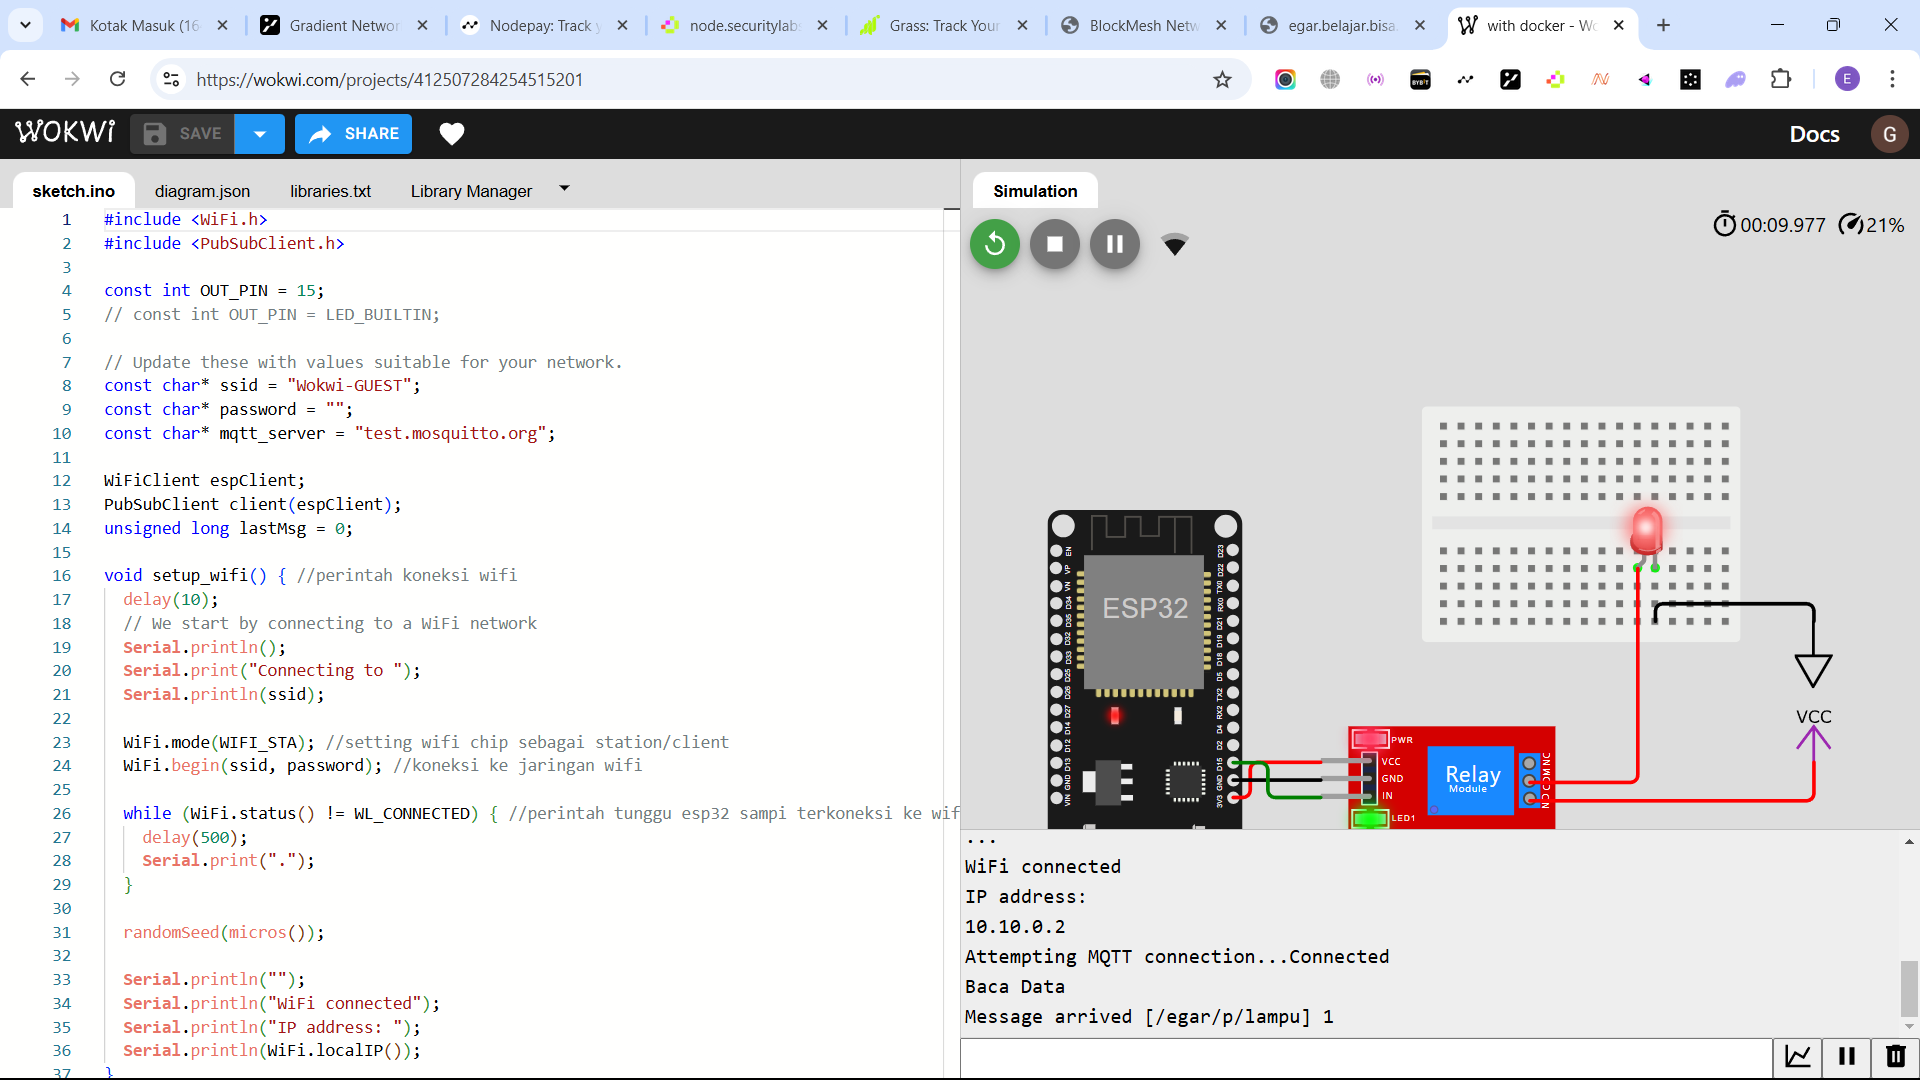
- Creating an IoT system using the wokwi simulator. The connection between the ESP32 and the backend is done through the MQTT protocol using the test.mosquitto.org broker. The backend acts as a message sender (publisher), while the ESP32 acts as a message receiver (subscriber). The system utilizes MQTT integration for inter-device communication and Flask to provide a web-based user interface.
- MQTT Connection:
Broker and Topic: The backend also connects to the same broker (test.mosquitto.org, port 1883) and interacts with the same topic, /egar/p/lamp.
Message Publication: The backend has a publish() function that sends messages to the MQTT broker on the topic /egar/p/lamps.
- Main Functions:
The /send endpoint:
The backend provides an HTTP POST endpoint to receive data from the web interface (form).
The message from the form (message) is sent to the MQTT broker via the /egar/p/lamp topic.
Based on the message value:
“1” means ‘Lights On’.
“0” means ‘Lights Off’.
- MQTT Publication:
The backend connects to the MQTT broker using connect_mqtt().

- If I click the turn on the lights button, the display on the frontend/website becomes like this, where the message has the status of the lights on with code 1 and is successfully sent to the topic (/egar/p/lights).

- Next, return to the wokwi simulator website to see if the IoT system runs through the use of users from the website if the results of the message arrived (egar / lamp) with code 1 and the lights in the wokwi simulator are on, it means that the application of the IoT system using the website as a user user can be considered successful / successful running.

- - If I click the turn off the lights button, the display on the frontend/website becomes like this, where the message contains the status of the lights off with code 0 and is successfully sent to the topic (/egar/p/lights).

- Next, return to the wokwi simulator website to see if the IoT system runs through the use of users from the website if the results of the message arrived (egar / lamp) with code 0 and the lights in the wokwi simulator are off, it means that the application of the IoT system using the website as a user user can be considered successful / successful running.
- That's all Thanks for the Final Results of the Project that I made myself :).

NB: SOURCE CODE BISA MENGHUBUNGI AUTHOR (LINKEDIN, INSTAGRAM), TERIMAKASIH :)
Informasi Course Terkait
Kategori: Algoritma dan PemrogramanCourse: Cyber Security