
IoT Kendali Lampu Via Whatsapp
Liberio Harapan Nainggolan

Summary
Summary:
IoT stands for Internet of Things, which refers to a network of physical objects or devices that are connected to the internet and can collect, send, and receive data. These devices can range from everyday objects such as appliances, vehicles, and smartwatches to industrial machines and sensors used in manufacturing and healthcare. IoT technology allows these devices to communicate with each other, collect data, and perform actions based on that data, ultimately leading to improved efficiency, productivity, and convenience.
Description
In our busy lives, we often forget important things like turning off the stove, lights, and faucets which can result in wastage and even fatal consequences such as fires. Therefore, smart home lighting is one solution to this problem where we can control our home lights from anywhere, checking their condition, turning them on and off.
Components needed:
• Node MCU CH340
• Relay module 1
• Female to female jumper
• Lamp
• Cable
• Fitting
Instructions:
1. The first step to installing Arduino IDE is to download it from the following URL: https://www.arduino.cc/en/software.
2. Click Install.
3. Open the Arduino IDE Application, the Arduino IDE parts can be seen.
Installing ESP8266 Board and Library:
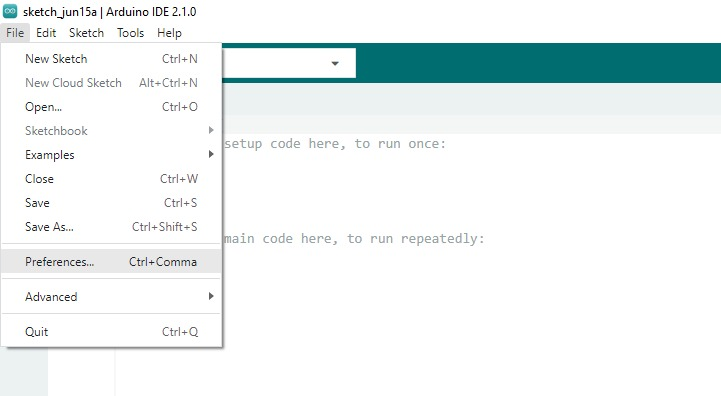
1. On the Arduino IDE homepage, open File -> Preferences.

2. Add the ESP8266 package repository link to the Additional Boards Manager URL column: http://arduino.esp8266.com/stable/package_esp8266com_index.json
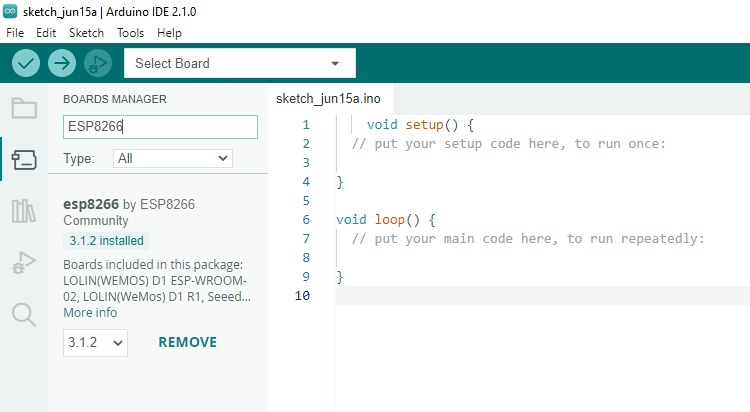
3. Go to Tools -> Boards -> Board Manager.
4. Install the ESP8266 library by typing "esp8266" in the search box, then clicking the Install button.
5. After installation, a new board type will appear in the menu: Tools -> Boards -> ESP8266 Boards. 
6. Go to Sketch -> Include Library -> Manage Library.
7. Install the ThingESP library by typing "esp8266" in the search box, then clicking the Install button.
CH340 Driver Installation:
1. The CH34x driver can be downloaded from various sources on the Internet or through its official website at http://www.wch.cn/download/CH341SER_ZIP.html.
2. After downloading the CH340 driver file, open the file, then click Install.
3. To ensure that the driver is installed correctly, connect the ESP8266 device with a USB cable.
4. Open Device Manager on the computer and look for the USB-Serial CH30 device name under Ports.
5. If it's already there, the device can be used.
Creating a Twilio Account:
1. Go to the Twilio website at https://www.twilio.com/ and select Sign Up.

2. Fill in all the required fields.
3. Verify your phone number and email.
4. Access the WhatsApp sandbox in the Settings menu and send the code to the provided WhatsApp number.
Creating ThingESP Account:
• Go to the ThingESP website at https://thingesp.siddhesh.me/#/ and select Create Account.

• Fill in all required fields.
• Create a project in ThingESP by clicking on Project in the left tab and then selecting Add New Project.
• After the project has been created, connect ThingESP with Twilio by entering the Twilio WhatsApp Endpoint URL into ThingESP.
After the project has been created, the next step is to connect ThingESP to Twilio by entering the Twilio WhatsApp Endpoint URL into ThingESP.
Codingan Arduino

#include <dummy.h>
#include <ArduinoJson.h>
#include <ArduinoJson.hpp>
#include <ThingESP.h>
ThingESP8266 thing("liberio005", "projectiot", "123123123");
#define relay 0
unsigned long previousMillis = 0;
const long INTERVAL = 6000;
void setup()
{
Serial.begin(115200);
pinMode(relay, OUTPUT);
thing.SetWiFi("wifi_ssid", "wifi_password");
thing.initDevice();
}
String HandleResponse(String query)
{
if (query == "lamp on")
{
digitalWrite(relay, LOW);
return "Done: LED Turned ON";
}
else if (query == "lamp off")
{
digitalWrite(relay, HIGH);
return "Done: lamp Turned OFF";
}
else if (query == "lamp status")
return digitalRead(relay) ? "lamp is OFF" : "lamp is ON";
else
return "Your query was invalid..";
}
void loop()
{
// if (millis() - previousMillis >= INTERVAL)
// {
// previousMillis = millis();
// String msg = digitalRead(relay) ? "lamp is ON" : "lamp is OFF";
// thing.sendMsg("087760472475", msg);
// }
thing.Handle();
}


Informasi Course Terkait
Kategori: BlockchainCourse: Teknologi Blockchain