
EDA on The Milk Quality Dataset
Faizal Apriansyah Pratama
Summary
Milk Quality Prediction (Classification)
About dataset
This dataset is manually collected from observations. It helps us to build machine learning models to predict the quality of milk.
This dataset consists of 7 independent variables ie pH, Temperature, Taste, Odor, Fat, Turbidity, and Color.
Generally, the Grade or Quality of the milk depends on these parameters. These parameters play a vital role in the predictive analysis of the milk.
Usage
The target variable is nothing but the Grade of the milk. It can be
Target
Low (Bad)
Medium (Moderate)
High (Good)
If Taste, Odor, Fat, and Turbidity are satisfied with optimal conditions then they will assign 1 otherwise 0.
Temperature and ph are given their actual values in the dataset.
We have to perform data preprocessing, and data augmentation techniques to build statistical and predictive models to predict the quality of the milk.
Inspiration
To leverage the benefits of machine learning in the dairy industry.
Description
1. Looking for datasets on kaggle.com, I chose the milk quality prediction dataset

2. Upload the dataset to google drive

3. Open Google Colab and create a new note, then connect to Google Drive.

4. Import pandas and call the dataset that has been uploaded on the drive.

5. Look at the number of rows and columns, data type and check whether there are missing values or not

After checking, it turns out that there are 1059 rows and 8 columns. There are data types int, float and object. And in this dataset there is no missing value
6. Perform data visualization by importing the matplotlib and seaborn modules. Display data using heatmaps. The heatmap is suitable for viewing the correlation matrix. The brighter the color, the greater the correlation, conversely the darker the color, the smaller the correlation value.

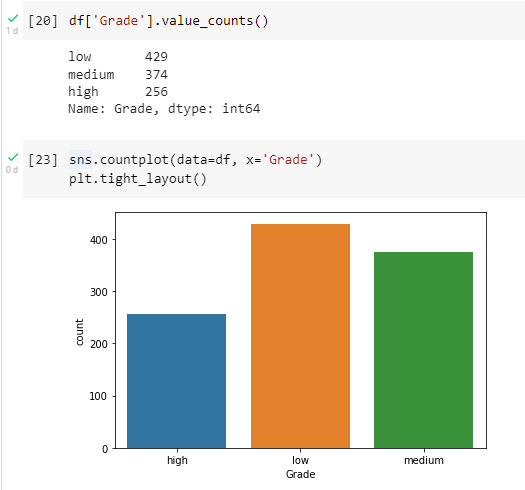
7. Next, visualize the data using bar plots. There are 429 grades low, 374 grades medium and 256 grades high. The following is a visualization display using a bar plot.

8. Next, classify the data. The module that needs to be inputted is sklearn.

9. Place the features in variable X, and place the target/label (grade) in variable y.

10. Divide the data into 2 parts, namely the testing dataset and the training dataset using the train test split module

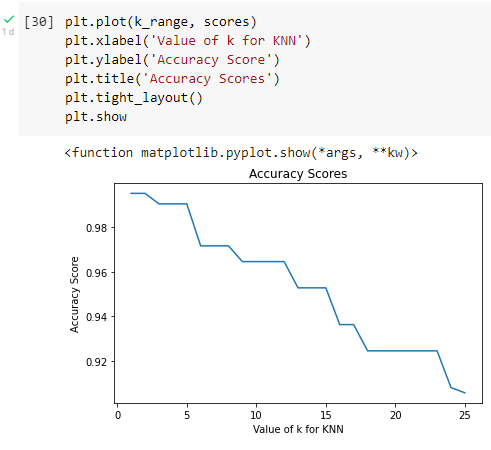
11. Use the K Nearest Neighbors (KNN) algorithm for data classification. First call the KNN module first then set the number of neighbors included

12. Show the results of the accuracy of the score

13. Another algorithm that can be used is the decision tree. First, import the decision tree algorithm, configure the algorithm as follows, then test, compare the accuracy of the y test and y pred values.

From the result of the predictions that are carried out produce an accuracy of 0.99….. or 99%
Informasi Course Terkait
Kategori: Data Science / Big DataCourse: Produk dan Desain Kecerdasan Artifisial (SIB AI-Hipster)